
Sierra has a new feature which is called ‘Optimise Storage’.
This basically means that if you are someone who never empties your trash, or is constantly running out of hard drive space, your machine can purge itself of all the old files you haven’t touched in forever. It can also store copies of your files in the Cloud for access on all devices.
This sounds like an awesome idea, but there are some things you need to be aware of before ticking those boxes:
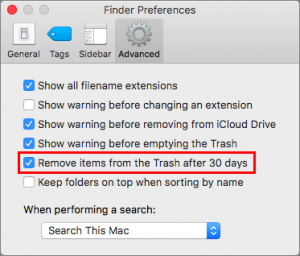
– The ‘Empty trash Automatically’ option does exactly what it says.
It will empty your trash can for you after the file living in it has been there for 30 days. Which is all well and good for those who don’t tend to run applications from their trash. If you are someone who never empties your trash, it is recommended you enable this feature. That way, your hard drive won’t fill to the point of being inaccessible.
This setting appears in Finder > Preferences > Advanced as the “Remove items from the Trash after 30 days” checkbox.
– The Optimise Storage section has a few preference options.
If you want to optimise the Storage on your computer, you are presented with two setup options; one to automatically remove watched movies and TV shows from your machine, and the other to keep either only recent or no email attachments.

Although it currently hasn’t been verified, we believe the Optimise Storage option only applies to movies and TV shows purchased within the iTunes Store. When enabled, iTunes purges watched shows and movies in order to help you regain some space on your hard drive.
To enable within iTunes, or to turn it off, go to iTunes > Preferences > Advanced, where you’ll find a checkbox called “Automatically delete watched movies and TV shows.”

– Storage in the Cloud is slightly confusing
The controls available in this section encapsulate two entirely separate features in Sierra, and the wording and checkboxes change depending on what you’ve already done.
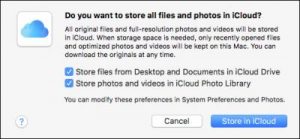
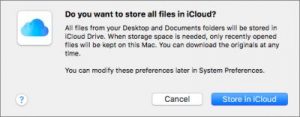
On a Mac that doesn’t have iCloud Photo Library enabled, when you click Store In iCloud, you get a dialog that gives you two checkboxes, one that lets you turn on syncing for your Desktop and Documents folders and another that enables you to turn on iCloud Photo Library. If either of those features is already on, the dialog changes (so it focuses on Desktop and Documents folder syncing).
When enabled in System Preferences > iCloud > iCloud Drive > Options, this feature moves your Desktop and Documents folders from your home folder to iCloud Drive. This means your folders will disappear from your home folder. However, you can still access them from the sidebar in Finder windows. From the Finder’s Go menu, or from within iCloud Drive.
Desktop and Documents folder syncing allows you to enable it on other Macs using the same iCloud account. The contents of those folders on other Macs are merged via iCloud, so you end up with a single unified folder for Desktop and another for Documents. You can even access the full contents of those folders via the iCloud Drive app. Accessible on any iOS device signed in to the same iCloud account.
Two warnings surrounding Desktop and Documents folder syncing:
First, if you have gigabytes of data in one or both of these folders, you may have to start paying, or pay more, for storage space on iCloud Drive. The first 5 GB is free, and after that Apple offers several tiers from 50 GB to 2 TB. The storage space is shared with iCloud Photo Library. So if you’re already paying for storage to sync photos, you may have enough.
The second warning is that turning off Desktop and Documents folder syncing is stressful. When you do this, in System Preferences > iCloud > iCloud Drive > Options, Sierra tells you that all your files will be available only in iCloud, which seems wrong: if you’re turning off syncing, you’re doing so because you want them locally. However, that dialog is followed immediately by another that tells you that you can recover your files from iCloud Drive.
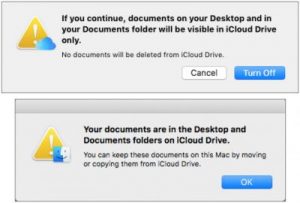
In fact, what happens when you turn off that feature is that Sierra recreates empty Desktop and Documents folders in your home folder. You can’t replace those, so you can’t drag the old Desktop and Documents folders from iCloud Drive to your home folder; instead, you must open each folder in iCloud Drive and move its contents to the local Desktop and Documents folders in your home folder.
If you have local copies of your documents and files backed up prior to optimising your storage, it’s all well and good.
However, if you do not, there is a possibility that you could end up with no local copies at all.
– Cloud storage uses the internet
If you are someone who doesn’t have the best internet connection or are conscious of how much internet you use, storage in the cloud probably isn’t for you.
Depending on the files you are storing in the cloud there is the possibility that the Cloud will smash your internet usage as it tries to pull your 32GB up to the cloud and back again so you can continue to access your files and keep working.
In short:
If you are going to use Optimised Storage on your machine, make sure you have a backup of all of your local files before you start. You will also need to make sure you have enough bandwidth to handle the cloud storage.
For more information on Optimised Storage, click here.